Jump to a Section
Plant Overview
| Common Name | Umbrella plant, Japanese aralia, false castor oil plant |
|---|---|
| Scientific Name | Fatsia Japonica |
| Plant Family | Araliaceae |
| Origin | These plants are native to the coastal woodlands of southern Japan and Korea |
| Height | 2 to 4 metres (6-13 feet), though it can be pruned to keep it smaller |
| Light | This shrub prefers a shady position and will not thrive in full sun |
| Temperature | Hardy down to -10°C |
| Hardiness | This plant is generally hardy as long as it is protected from cold easterly winds |
| Soil | This plant is not fussy about soil but will grow particularly well in rich, heavy soils |
| Fertiliser | Apply a slow-release fertiliser or a handful of blood fish and bone in April and August. Fertilise container grown plants monthly during the growing season |
| Propagation | You can propagate these plants by seed or cutting, however, the simplest way is by layering |
| Pests | These plants are resistant to most pests and disease but are occasionally affected by aphids, caterpillars and capsid bugs |
| Difficulty | Easy |
This hardy evergreen is a great addition to the garden, adding a lovely tropical vibe. It can survive in the most sunless corner where little else will grow. Japanese Aralia is very hardy and long-lived; given a reasonably sheltered position they will give you years of colour and structure.
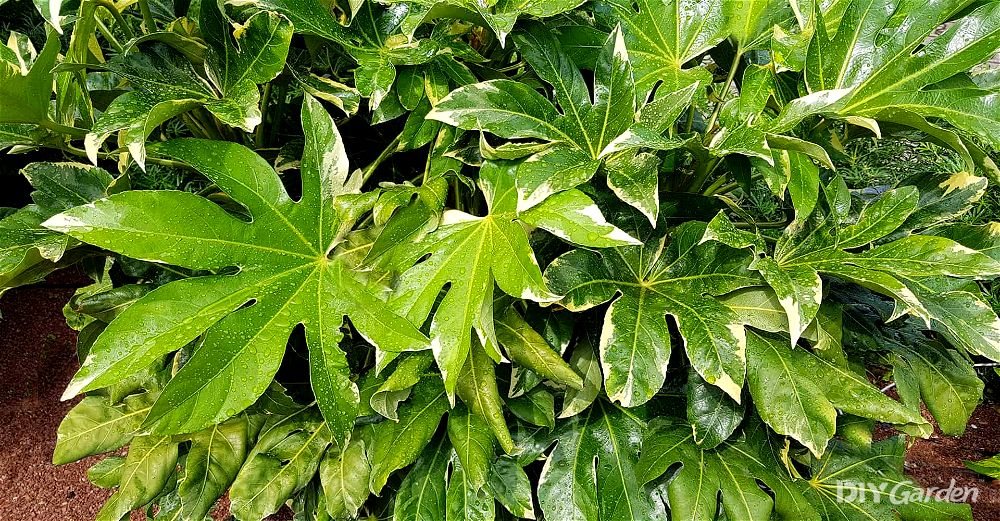
The leaves of these plants are stunning. They are large and lobed, like giant outstretched hands with a somewhat-leathery texture. Mature plants may also produce clusters of striking creamy-white flowers in October and November, followed by fat black berries that birds love.
These plants are easy to care for and propagate and are rarely affected by pests and diseases. This makes them an all round good choice for a low-maintenance garden.
This guide will help you to choose and care for a fatsia japonica in your garden.
Fatsia Japonica Care
These plants are quite self-sufficient and generally look after themselves. A twice-yearly application of fertiliser and watering during dry spells is generally all they need to keep them happy.
Care should be taken to buy your fatsia from a garden centre where it has been grown outside. Sometimes fatsia are grown for indoors and conservatories and without a considerable period of hardening off will not survive outdoors.
Light Requirements
This plant prefers light shade but will do surprisingly well even in full shade. It does not like to be planted in full sun and has a particular dislike of strong afternoon sun which will cause its leaves to yellow and wilt.
Water Requirements
This plant should be watered in dry spells. They like moist but not waterlogged soil. Container-grown plants should be watered thoroughly just as they dry out.
Soil Requirements
This plant will cope with light soils, heavy clay and chalk, though it has a preference for soils that are rich and fertile. In poor soils, additional fertiliser may be required.
Fertiliser Requirements
You should feed your plant with a handful of blood, fish and bone or an organic slow release fertiliser in April and August. Container-grown plants should be fed with a handful of blood, fish and bone or organic fertiliser monthly, between mid-March and mid-August.
Planting
Planting is best undertaken in spring so that your shrub has a chance to establish before winter. However, they can be planted in autumn as long as the soil is still warm. Position your fatsia in a shaded spot, sheltered from cold, easterly winds. It will need a space of 2 metres (6 foot) in which to grow.
Dig a hole about twice the width of the rootball and sprinkle in some organic matter or blood, fish and bone, working the material into the soil. Place the plant in the hole at the same depth as it was in the pot. Backfill and firm the soil. Water well to settle the soil around the rootball and remove any air pockets.
Keep your plant moist but not waterlogged until it is well established.
If planting in a container choose one of about 60 cm in width and 60 cm tall and use a loam-based compost. Position the pot out of strong afternoon sunlight and chilly eastern winds.
Maintenance
This plant may be damaged by particularly harsh winters. You may see dark, drooping leaves and some may even turn black. You might think it will not survive as it looks so unwell, but it will usually come back just as good as ever with new growth when the weather warms up. Simply trim back any damaged stems and leaves once the danger of frost has passed.
In late July and early August, some of your plants lower leaves may yellow and drop off. This is just part of its natural cycle and is nothing to worry about. It will produce new growth in spring.
Fatsia does not like being moved so if it outgrows its space it is better to prune it back to fit the location rather than transplanting it. Of course, if it is planted in unsuitable conditions such as full sun, then it would be best to move it, preferably in spring.
Repotting
If planted in a container, you should remove the top 5 cm (2 inches) of soil every year and replace with fresh. After two or three years you may need to repot your fatsia into a larger pot.
Looks Good With
Fatsia japonica looks great on its own as a specimen plant, especially when planted in front of brickwork or in a large pot on the patio or balcony.
This plant also provides wonderful shape, structure and colour in the tropical garden. It looks good as a backdrop for canna lilies, hostas, sophora, clianthus and crocosmia. It’s rounded leaves also contrast well with other spikier leaf shapes such as bamboo, phormium and grasses.
It can also be used with other evergreen plants with contrasting leaf colours. The bright Choisya ‘Sundance’, the variegated Eleagnus or the silvery Pittosporum ‘Silver Queen’ would be good choices in a shrubbery.
Pruning Advice
Pruning should be done in late spring.
Remove any leaves that have yellowed in late summer along with any shoots that have been damaged by frost.
As the shrub matures you can remove any bare, straggly stems. New shoots will grow from the base. This will keep your shrub dense and shapely and avoid having bare stems at the bottom with all foliage at the top.
To keep your plant growth to a nice bushy habit and to a certain size you can prune it quite heavily. You can cut back the oldest stems to ground level which will rejuvenate the shrub. The rest of the stems can be cut back by about 60 cm (2 feet). Make each cut just above a side stem to keep a nice branching shape. If the centre of your plant is overcrowded, then remove the thickest central stems back to ground level. This will allow for better air circulation and reduce the risk of disease.
Pot grown plants will need regular pruning to maintain their size.
After pruning is a good time to apply a spring fertiliser of blood fish and bone or organic fertiliser.
Fatsia Japonica Propagation
Your fatsia may be propagated by seed, layering or cuttings.
Propagation by Seed
You can harvest the berries of your fatsia when they are fully ripe.
Remove the flesh from the seeds and press the seed into moist potting soil in a seed tray. Do not cover them as they require light to germinate. Set the seed tray on a north or west facing windowsill and keep the soil moist. Once they have a set of true leaves and are large enough to handle you can pot them up individually.
They will need to be kept indoors or in a greenhouse over winter. Once the weather warms, harden off your plants by placing them outdoors for a spell, gradually increasing the time each day until they get used to outside conditions.
Propagation by Layering
Layering is an easy way to propagate your fatsia. The cutting is allowed to root before it is cut away from the parent plant, so it continues to receive nourishment as it develops.
Choose a stem that will easily reach the ground without breaking. Make a cut on the lower part of the stem where it touches the ground but do not cut more than halfway through the stem. Bury this part of the stem in the soil. You can hold it down with a strong forked twig or stone if necessary. Place a stick in the ground and tie the end of the branch to it in order to help it grow upright and keep it off the ground.
Once the new roots form you can cut away the new plant from its parent and pot it up.
Semi-Hardwood Cuttings
Cuttings should be taken in summer when new growth is just firming up and becoming woody at the base.
Prepare pots with a mixture of potting compost and plenty of sand or grit to improve drainage. Make holes for the cuttings with a pencil or small stick.
Cut off the soft tip of the stem and divide the rest into 10-15 cm (4-6-inch) cuttings, ensuring that the base of each cut is just above a leaf node as this is where it will form roots. You should remove the lower leaves from each cutting and any large leaves may be cut in half to reduce moisture loss. Dip the base in rooting hormone powder to encourage the development of roots and discourage rotting.
Place each cutting in a prepared pot to a depth of around 5 cm (2 inches).
Cover the posts with large plastic bags and secure these with an elastic band. This will increase the humidity and encourage the roots to form. Place them in a sheltered spot or in a cool greenhouse out of direct sunlight. The cuttings can also be placed on a north or west facing windowsill, however, they will need careful hardening off before they are moved outside.
Once a week, remove the plastic to water your plants and give them an airing. Check the plants for any dead or dying material and remove this.
Fatsia Japonica Problems
Fatsia japonica may look tropical and tender but they are actually tough plants that are rarely troubled by pests and diseases. However, occasionally, certain things may cause problems.
Pests
There are a few pests which may take a liking to your fatsia japonica.
Aphids
Aphids can cause growth problems for fatsia japonica by feeding off the leaves. You’ll often notice aphids clustering on the underside of leaves. Also, if there is a sticky residue on the plant’s leaves/stem, this could be left by aphids. Aphids can be removed with a strong jet of water or by spraying with a soap solution.
Caterpillars
Caterpillars can damage fatsia japonica by chewing on the leaves. They can be removed by hand, but you might have to go out in the dark with a torch to find them.
Capsid Bugs
If your plant is affected by capsid bugs the new growth may come through partly eaten away. The flowers may also be distorted. You should cut back any affected parts of the plant and remove any weeds from around your plant as these may be acting as hosts to the bugs. An insecticide may be used if the problem is severe, however, do not apply this during the flowering period as it can harm pollinating insects.
Diseases
There are just a couple of diseases to keep an eye out for.
Fungal Infections
Occasionally fatsia japonica may be affected by fungal infections that cause blotches on the leaves. Your plant will probably fend off the attack, however, improving its growing conditions can help.
Good air circulation is vital to reduce the risk of fungal attacks. Thin out any overcrowded branches and cut back anything that is encroaching on your plant’s space. Remove any dead plant material form the surrounding area.
In addition, water you plant at the roots and early in the day. This will reduce the amount of time the leaves are wet, which will discourage fungal leaf diseases.
Shot Hole Disease
This is a fungal disease that causes small brown spots, that eventually turn into holes, on the leaves. This is not usually fatal to the plant and it will recover. The best thing to do is to cut back all damaged parts of the plant to healthy growth.
Disinfect your pruning tools after each cut to avoid spreading the disease. Remove any weeds from the area and then feed and mulch it to help it retain moisture. Keep it well watered and remove any weed growth from around it and this will give it a good chance of recovery.
Fatsia Japonica Varieties
Fatsia japonica ‘Variegata’
This is a nice, bushy shrub that reaches a maximum height of 2.5 metres (8 feet). It has leaves that are up to 30 cm (12 inches) wide and are edged with cream. The flowers are small and spherical and are followed by small black berries.
Fatsia japonica ‘Annelise’
This lovely variety has dark leaves splashed with golden yellow and emerald green. They can be up to 30cm wide. The shrub grows to about 1.8 – 3 metres (6-10 ft) tall. It does well in shade and is frost hardy.
Fatsia japonica ‘Moseri’
This is a compact form with dramatic foliage, large flowers on white stems and large black berries. It reaches a height of 2.5 metres (8 feet) and flowers from October to January.
Fatsia japonica ‘Spiders Web’
This variety has speckled white variegation on the leaves. It does extremely well in deep shade and flowers in November and December. This is quite a slow growing variety and its ultimate height is around 2.5 metres (8 feet). This makes it good for smaller gardens. It can also be grown in a container and pruned to keep it to a smaller size.
FAQs
Fatsia japonica is quite often damaged by late frosts but it doesn’t come to much harm. Once the weather warms up again it will soon produce new shoots.
I would leave the damaged stems alone until all risk of frost has passed. They will actually offer some protection for the plant – if you prune and encourage it to produce new growth now, this might also be damaged.
It sounds like your plant is getting too much sun. This plant is a shade lover and really hates scorching afternoon sun. It will cope with some morning sun but really needs shade in the afternoon. Try moving it to a shadier spot or creating something to provide it with afternoon shade and see if it perks up.
Soft, yellowing leaves can also be a symptom of overwatering. Too much water can wash away nutrients leaving your plant deficient. Avoid watering until the soil has almost dried out. You can also add a well-balanced fertiliser if the soil is poor.
Share