Read Reviews
The Best Allotment Polytunnels
-
Birchtree Polytunnel (6 x 3 x 2 m)
-
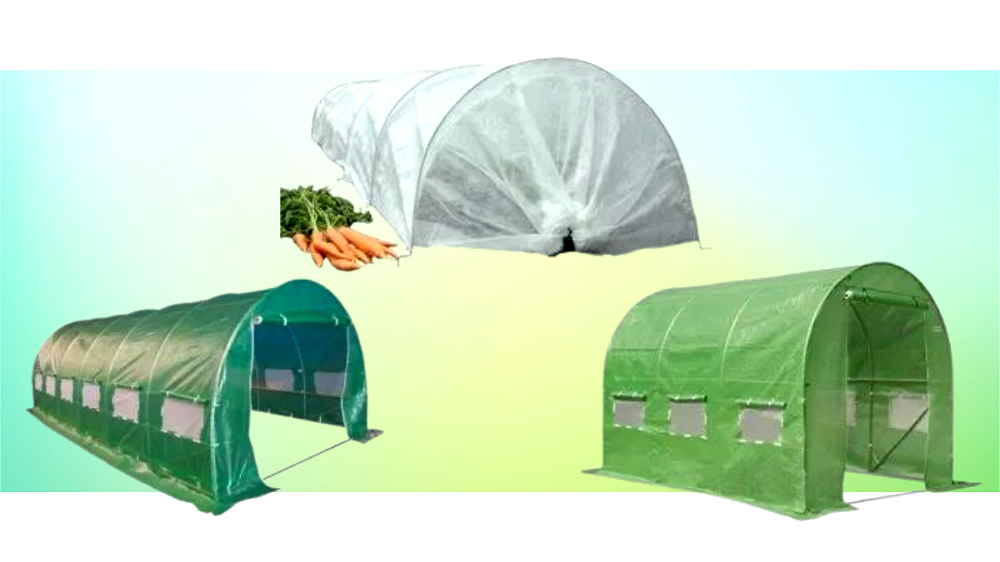
Haxnicks Giant Easy Fleece Tunnel (300 x 60 x 45 cm)
-
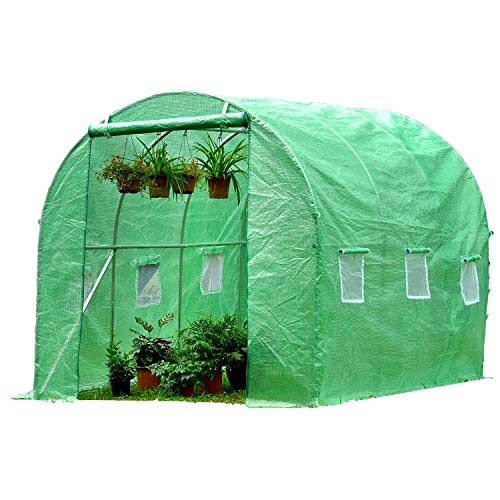
Garden Point Green Polytunnel Greenhouse (2 x 2 x 2 m)
-
Garden Grow Polytunnel (3 x 2 x 1.9 m)
-
Parviflore Poly Tunnel Plastic Greenhouse (6 x 2 x 2 m)
Allotment Polytunnel Reviews
- Assembly is relatively easy and straightforward, given the size (having two people will help)
- Remains robust in relatively strong winds of <40 mph
- Strikes a good balance between quality and affordability for its size
- Doors can be rolled up and secured above doorway to keep them out of the way when working
- Plenty of Velcro fastenings ensure that the tunnel is well secured to the poles
- The cover is a little thin so holes can develop over time, especially in higher winds or during assembly
- The zips on the doors aren’t the best quality and need to be used carefully to avoid them breaking
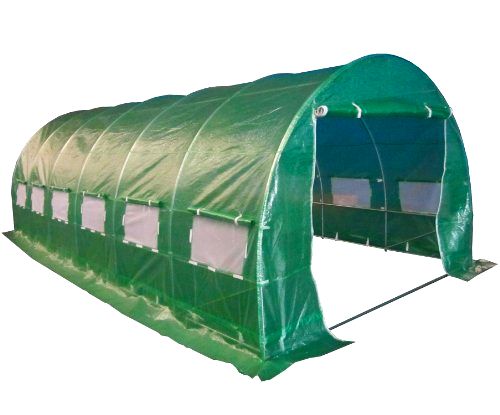
This large Birchtree Polytunnel helps create a protective environment for plants, covering an extensive area and keeping them sheltered from strong winds.
Made from 140 g PE fabric, with a galvanised steel metal frame, this tall 6 x 3 x 2 m polytunnel can cover a large flowerbed or vegetable patch.
There are two roll-up doors, one at each end of the polytunnel, each with a zip fastening. These help to provide uninhibited access when watering plants. The roll-up design also allows for increased ventilation if temperatures get too high under the polytunnel.
However, it should be noted that the zips are not very robust, and some gardeners have reported that the zips can become damaged or broken after prolonged use. Because of this, it’s necessary to be cautious when opening and closing the entryway.
In terms of assembly, this reasonably heavy-duty polytunnel is straightforward to put up. Due to its large size, the process is greatly aided by the help of two people. The written instructions are basic at best, and nonsensical at worst, but there is a labelled diagram to help as well – the poles are numbered, and it’s all relatively intuitive. Expect the whole process to take around 2 – 3 hours.
According to reports from gardeners, this good quality polytunnel can withstand high winds of around 40 mph, though of course these aren’t too common in the UK.
Overall, this polytunnel is considered relatively good value for money, given its size and strength. It can withstand reasonably high winds and there are plenty of Velcro straps to attach the cover to the metal frame. There’s no anchor kit provided, so a weighted system will need to be devised separately.
If you have a large area to cover, this is one of the best polytunnels for an allotment or vegetable garden, particularly if you’re keen on the green PE style.
Did you find this review helpful?
- Great for small gardens or allotments thanks to its compact design
- Easy to fold away and store (folds up like a concertina)
- Protects plants from frost
- Stops bugs and birds being able to access plants
- Can be brought out quickly if there is a sudden frost warning
- Tending to the plants inside the tunnel can be difficult
- Fabric cover tends to slide up around the metal supports, causing gaps to open up at the bottom of the cover - need to keep an eye on this during assembly
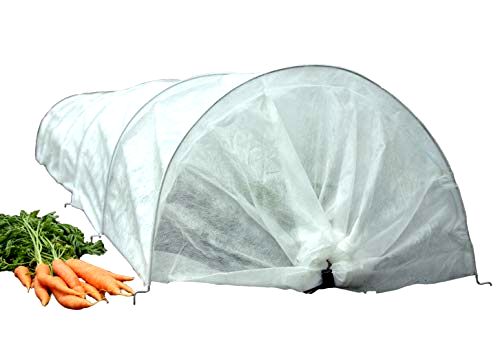
This Haxnicks Giant Easy Fleece Tunnel has a few different uses. Due to its tight-weave fleece construction, it protects plants from insects in summer, and it’s also sufficiently insulative to help plants survive frosty nights.
As a relatively small, non-permanent structure, this fleece tunnel can be put up and taken down quickly, and used only when required. This is particularly useful considering how unpredictable our UK climate can be; there’s nothing worse than thinking your plants are finally safe from winter, only to discover we’re in for a bout of frost in March!
Assembly is straightforward, with galvanised steel hoops that support the polypropylene fleece. They push easily into the ground, and are threaded through the fleece, so all you need to do is extend the tunnel out like a concertina. It also folds up easily too.
The whole tunnel doesn’t take up a lot of space when extended, measuring 300 x 60 x 45 cm. It’s therefore suitable for a lot of differently-sized vegetable patches, allotments and gardens, offering a lot of flexibility for protecting plants.
It’s one of the best polytunnels for an allotment that has plants which may need protection from frost, bugs, birds or all of the above. The drawstring ends make it easy to close off and create a barrier against both the weather and animals.
Unlike larger polytunnels, this fleece tunnel will be less exposed to the wind and less prone to weather damage. Its small size also makes it a good solution for allotments or gardens without much storage space, and it can easily be put up and taken down as required.
Did you find this review helpful?
- Not limited on head room despite more compact size - gardeners of 6 ft still don't have to crouch
- Clear instructions and straightforward to assemble with the help of two people
- Stands up relatively well in strong winds
- Net windows help keep the interior cool on hot days without letting bugs inside
- Zips are a little fragile and need to be used slowly and carefully to prolong their life
- Some of the stitching may be a little loose, like where the Velcro connects to the cover, meaning seams shouldn't be pulled too roughly
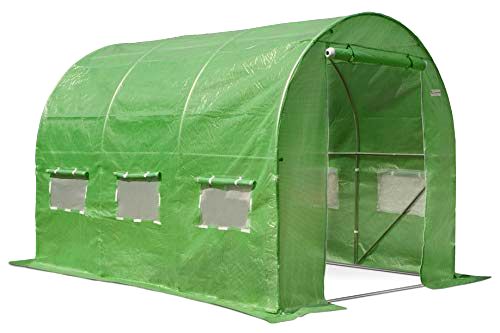
Whilst some polytunnels will make a sizeable dent in your bank balance, others, like the Garden Point Green Polytunnel Greenhouse are much more budget friendly.
Measuring 2 x 2 m, this is one of the best polytunnels for an allotment with smaller vegetable patches, or several separate growing areas. Due to its reasonable price, numerous units could be purchased if you have plants that require different growing conditions over winter; plus, it’s also small enough for vegetable patches in the garden as well.
Although it’s a cheaper option, this Garden Point Polytunnel remains relatively robust and sturdy. It can cope with higher winds, and with being placed in allotments that aren’t particularly sheltered. Nevertheless, as with most polytunnels, there are still some customer reports of it tearing in the wind, and additional weights or stakes are required to secure it to the ground.
Assembly is simple, with a manual that is clear and concise, as well as a design that fits together logically. At least two people are needed to put it together, to help ease the cover over the frame and avoid it catching on the bolts.
There are six “windows” fitted into the side of the polytunnel, made from netted mesh, that can either be covered or uncovered depending on how much ventilation is required. There is also a roll up door. All of these offer a useful way to either let in fresh air, or cool down the polytunnel during warmer weather.
It’s one of the best polytunnels for an allotment with small growing areas, or for growing plants in a medium-size garden as well. The cover is made from 140 g green PE plastic, and the galvanised steel frame compromises of 25 mm poles.
Did you find this review helpful?
- A good size polytunnel that allows you to tend to your plants without stooping down
- Netted windows allow for option of gentle ventilation without having to leave door open
- Large roll-up door allows for easy entry and exit into the polytunnel
- As a medium-size tunnel it offers a good balance between size, quality and price
- Assembly instructions are not very clear
- Cover is a little tight for the frame which can make it difficult to pull over the frame
- Plastic cover may tear away from the Velcro in high winds because there is no reinforcement
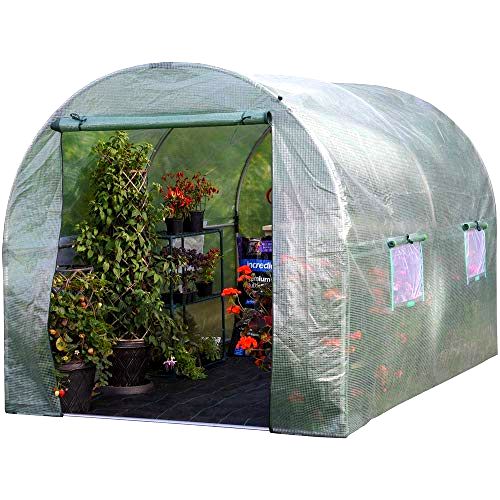
If you’re relatively new to gardening, or simply don’t want to splash out on an overly-expensive polytunnel, the Garden Grow Polytunnel is a good option to consider.
It’s suitable for gardeners with medium-size plots, as the tunnel itself measures 3 x 2 x 1.9 m. Although it is not as high quality as some more-expensive models, it still strikes a good balance between size, price and quality.
The semi-transparent PE cover is mounted over a powder-coated steel frame. Plastic joints connect the poles together to make assembly easier. Putting it together is relatively straight forward but requires some common sense, given that the instructions are not overly clear.
There are four mesh windows that can be left covered to keep heat in, or, alternatively, the plastic covers can be rolled up to allow air through the mesh. This can aid with ventilation and stop unwanted damp from hanging around inside the polytunnel. Similarly, there is a roll up door which can either be close (with the zip fastening) or left open for access and ventilation.
In terms of weather resistance, the frame stands up well to strong winds and turbulent weather, although it will likely need weighting down with stakes (which aren’t included). The PE cover is relatively resilient as well, but it does have some weaknesses.
Primarily, the cover is only held on to the frame using six pieces of Velcro, and there is no way to secure it to the frame in the middle. Therefore, it may be necessary to engineer additional ways to attach the cover to the frame when it arrives.
It could need reinforcing in other areas too, to stop the Velcro tearing the cover during high winds.
Nevertheless, for the price/size/quality ratio it does have a lot to offer, and it’s the best polytunnel if you want an inexpensive but value-for-money option.
Did you find this review helpful?
- Mesh windows help with maintaining temperature and keeping bugs out
- Maintains structure even in most wet and windy weather
- Assembly instructions are simple to follow and assembly takes approximately 2.5 hours
- 2 m height is tall enough to comfortably stand inside without stooping
- Water can accumulate at the top and may weigh the fabric down causing tears
- Design only fixes to the ground in four places and may need further reinforcement to make the structure more secure
To protect your plants in different weather, the Parviflore Poly Tunnel Plastic Greenhouse has a UV-resistant cover, galvanised-steel frame, 25 mm reinforced arches and ventilation options in case of overheating.
The UV-resistant reinforced PE cover stops plants from getting excessive exposure to UV rays in the summer time, protecting them from burning. Similarly, the six mesh windows can be uncovered to help with air flow and regulate temperatures if it gets too hot.
In more unpredictable weather, the waterproof cover stops plants from getting over-watered, and the combination of the frame and cover helps protect plants from wind damage.
Nevertheless, it would be remiss to mention that some winds can be too strong for this polytunnel, and if it is too exposed, it could suffer some damage. The plastic cover is not as strong or thick as more expensive polytunnels. But then again, it doesn’t cost as much either.
Measuring 6 x 2 m, this is a suitable choice for medium-size allotments. There are 2 metres of headroom inside the tunnel as well, so for many people – up to approximately 6’5” – there’s no need to stoop.
The fixings are of reasonable quality, but the zip for the door is not overly strong and will need to be used with care to avoid breaking it. There are also only eight zip ties included for holding the cover onto the frame, and they are quite short and fiddly to attach.
Assembly takes approximately 2.5 hours.
Did you find this review helpful?
Clive's Smart Buying Tips
How to Choose the Best Allotment Polytunnel
Polytunnels are affordable, easy to set up and make it far easier to grow a range of plants and produce.
They can act in a similar way to a greenhouse, keeping temperatures up and humidity high and therefore allowing plants from different climates (or seasons) to grow comfortably. They can also protect plants from wind damage, insects and frost, depending on the style you go for.
Although polytunnels can be used in the garden, they are often seen on allotments due to their large size. They’re a great way to create more space for growing, even if you already have a greenhouse. Plus, there are polytunnels available that are suitable for smaller spaces.
In order to find the right allotment polytunnel, you’ll need to consider how much space you have available, your budget, and the results you want to achieve.
The following information should help you find the best polytunnel for your allotment:
Choosing the Right Size Polytunnel
Polytunnels come in many different sizes.
If you’re after more of a greenhouse feel, opt for a walk-in polytunnel with an internal height of around 2 metres. With one of these models, you can walk around inside the structure and tend to your plants without having to stoop. This also gives you the opportunity to grow more plants, including fruit trees. Some tomato plants can also grow to around 2 metres.
If you lack space in your garden or your allotment is only small, choosing a garden polytunnel that’s smaller and closer to the ground will feel less intrusive. There are small polytunnels available that are less than 50 cm high but still offer protection to specific plants.
In terms of length, polytunnels can range from around 3 metres long to upwards of 20 m. You’ll need to leave space around the polytunnel to erect it and carry out maintenance. Also, if using heaters, it will be easier to maintain the temperature of smaller polytunnels. Therefore, you may benefit from using several smaller polytunnels as opposed to one large one. This is also true as different plants may require different conditions.
Selecting the Right Cover Material
The covers of polytunnels can be made from a range of materials. Different materials will offer different properties.
Many polytunnels are made from polythene plastic sheeting. There are various types:
Clear Polythene
This allows a lot of light inside the tunnel, allowing plants to benefit from the full spectrum of light that they require. It can be useful in countries like the UK, because plants here can struggle to get enough light as it is – you may not want to block any more of it with a polytunnel.
It does not offer a lot of heat protection and therefore is best used in summer, not in winter. Some crops will not appreciate so much direct light.
Polythene with an Infrared Additive
This type of plastic cover doesn’t let heat escape quickly through the cover. Therefore, it is good to use if heating the polytunnel, because the heat will remain trapped.
It’s useful for any plants that require a warmer environment.
White/Green Polythene
These polytunnel covers are slightly more opaque and do not allow as much light in. They create shady conditions inside the polytunnel which are suitable for shade-loving plants.
Green polythene absorbs a lot of the red-light spectrum. As a result, it’s particularly beneficial for plants which thrive in green-light spectrum conditions.
Fleece
Fleece is particularly good at insulating plants and keeping them protected from frost. It’s used for smaller polytunnels and also keeps bugs and birds away from specific plants. Some people choose to use fleece inside of larger polytunnels in order to protect their plants that way.
Additional Features
Different styles of polytunnel are available depending on your needs. The following features may be worth looking out for:
Doors
Polytunnels can either have doors made from the same material as the rest of the tunnel, or framed, structured doors. They may simply be flap openings, or slightly more sophisticated zip-lock doors. The better the door closes, and the less gaps that it leaves, the more insulated the polytunnel will be. Structured, hinged doors will only feature on more expensive polytunnels.
Zip doors can also work well, but the zips don’t tend to be very robust. They can break easily.
Ventilation
One of the main benefits of having a polytunnel is being able to control the environment that your plants and produce are growing in.
While polytunnels are loved for their warmth, they can get very hot and stuffy. Fresh air is important when it comes to reducing moisture levels, keeping your plants cool and improving air flow.
Some polytunnels have air vents/’windows’ on the sides, which can be opened or shut depending on the weather.
Additional Sections
Some polytunnels can be extended. This is a great option for those who don’t currently have the space available for a large polytunnel, but may do later on. You should be able to purchase additional sections which can be attached to your polytunnel if you move to a larger area.
Positioning and Reinforcing a Polytunnel
Ideally, you want to place your polytunnel somewhere where it won’t be subjected to a lot of wind. Unfortunately, you may not have much choice – your allotment is in a fixed position, after all. Here you’ll find more information about positioning and reinforcing your polytunnel to protect it as much as possible.
Positioning Your Polytunnel
You may want to position the polytunnel’s door so that it does not frequently face oncoming wind. If it faces the direction that the wind come from, gusts may catch inside the polytunnel and attempt to lift it from its position. In the UK, the prevailing wind most commonly comes from the west or south west. Therefore, it may help to position the door of your polytunnel facing east or north east.
Reinforcing Your Polytunnel
There are a couple of ways you can reinforce your polytunnel to make it stronger and more resilient against the elements (particularly against the wind).
Adding Crop Bars/Bracing
Crop bars and braces are horizontal bars that are added across the top of the polytunnel. They add reinforcement and create a stronger structure overall.
Not only do they help the polytunnel become more structurally sound, they will also support the weight of any rain or snow that may gather on top of the polytunnel.
Using Ground Anchors and Fixing Plates
Ground anchors come in many shapes and sizes, from corkscrews to curved stakes. All polytunnels should be at least held down by ground anchors, so don’t skip this step.
Anchor plates can be used to create a firmer, more secure foundation for polytunnels. Anchor plates are buried into the ground, with a hollow metal tube that remains visible above ground level. The structural frame of the polytunnel is then inserted into this tube. This is a great way to stop the polytunnel from moving.
Trenching
Trenching involves burying the edges of the polytunnel under the ground. For this method, the plastic sheet of the polytunnel needs to be longer than the frame of the polytunnel. Only certain models feature this design. If your polytunnel allows for trenching, you can dig a trench along the perimeter of your polytunnel and then bury the bottom of the plastic sheeting in this trench.
READ NEXT: The Best Cordless Strimmer For Your Allotment
Benefits of a Polytunnel for an Allotment
There are a number of reasons why so many people opt to erect a polytunnel in their allotment.
- Warmer growing environment. Polytunnels are noticeably warmer than the outdoors, especially on sunny days. The warmer temperatures mean you’ll be able to grow crops you wouldn’t normally be able to in the UK, and you can also grow year-round with the use of a heater. In winter, polytunnels can help protect plants from frost.
- Longer growing season. On sunny days, your polytunnels will warm up quickly. This is especially noticeable in spring and autumn, where the sun still shines but the air stays a little chilly. Sunny days will warm your polytunnel, extending the growing season.
- Controlled environment. The climate inside a polytunnel is far easier to control than the climate outside. You’ll be able to control the temperature to some extent, and there’s less risk of rain, wind or frost damaging your plants.
- More cost effective than greenhouses. Opting for a polytunnel over a greenhouse should work out a lot cheaper. Polytunnels can also be erected on soil bases, and they are relatively easy to put together.
- Range of sizes. Polytunnels come in a huge range of sizes, so whether your allotment is large or small, you should be able to find a model to suit.
- No planning permission required. Like greenhouses, polytunnels don’t require planning permission. This makes them far less time consuming to set up than other outdoor structures.
- Portability. Polytunnels can be moved around the allotment or garden if needed. They are generally very lightweight.
- Protects plants from insects, birds and animals. Polytunnels also protect your produce and plants from the wildlife that comes into your garden.
Allotment Polytunnel FAQs
Polytunnels and greenhouses work in similar ways, both designed to boost your harvest and protect plants from bugs and birds.
There are several advantages to owning a polytunnel. They can be built onto a soil base and they’re very easy to assemble. Polytunnels can be stored easily, moved around the garden and are relatively simple to disassemble.
Greenhouses on the other hand are more expensive. They’re a much more permanent structure. While greenhouses can look great, they aren’t the best option if you lack garden space and the ground they are built on must be hard and level. They will however, last much longer than polytunnels.
Polytunnels provide protection to plants and can let you continue growing weeks after the season’s end. The material used to build them allows the interior to heat up from the sun. The warm air and humidity is contained, creating a microclimate which allows plants to grow – including those that wouldn’t naturally grow in the UK!
Polytunnels also protect your plants from bugs, birds and animals; they often have mesh windows that allow for ventilation without letting pests in.
Polytunnels are usually made up of a steel frame and polythene covering. While greenhouses should last a lifetime, polytunnels have a shorter lifespan. However, polytunnels vary in quality so exactly how long it will last depends on which model you buy.
Generally, a high-quality polytunnel frame could last for up to 20 years, while the polythene cover may need replacing every 3-5 years. Lower quality polythene covers may need replacing annually.
Share