Ideally, your petrol lawn mower should be serviced once a year. This maintenance will help to keep it running efficiently and prevent any problems going unnoticed. Taking it to be professionally serviced is one option, but doing this yourself is actually pretty easy, and could end up saving you quite a bit of money.
Here’s what you’ll need to do to service a petrol lawn mower at home:
1. Remove the Spark Plug
Always begin by removing the spark plug. This will stop you from accidentally turning the engine on while you’re taking things apart. Removing the spark plug is absolutely crucial and a step that shouldn’t be skipped.
You should also remove any fuel from your mower before servicing it.
2. Replace the Air Filter
The air filter is an important part of a petrol lawn mower and benefits from being changed once a year. They’re usually inexpensive and easily available.
You should clean your mower, and clean around the air filter before removing it. The air filter can usually be found at the top of the engine, encased by either metal or plastic. You may need to undo a couple of screws to get it out, or the cover my simply lift off.
If it is a sponge filter, and you recently changed it or it doesn’t look like it needs replacing, clean it with dishwasher soap and warm water. Dry the filter by squeezing it between a paper towel and leaving it out to air dry.
While changing your air filter, don’t forget to also give its holder a wipe down to remove any dirt and debris.
3. If Necessary, Clean Your Carburettor
If your lawn mower has been running without any problems, then you can skip this step. However, if you’ve been having engine problems, such as trouble starting the mower, white smoke, or the engine cutting out, then you should service the carburettor.
You’ll need to unscrew the carburettor and take it apart to clean it – which isn’t as daunting as it sounds! If you’re worried about putting it back together, take photos at each part of the disassembly process so that you can refer to them later.
Slowly take apart all pieces of the carburettor, working from the top down. Clean each piece as you can and be ready with some rags or cloths in case fuel spills out (which can often happen). Work in a well ventilated area.
Use carburettor cleaner, which comes in a can, to help clean the different components. You may need to replace the gasket if your mower has been leaking fuel or sucking air.
After cleaning all of the pieces, reassemble the mower if there aren’t any further problems that need to be addressed.
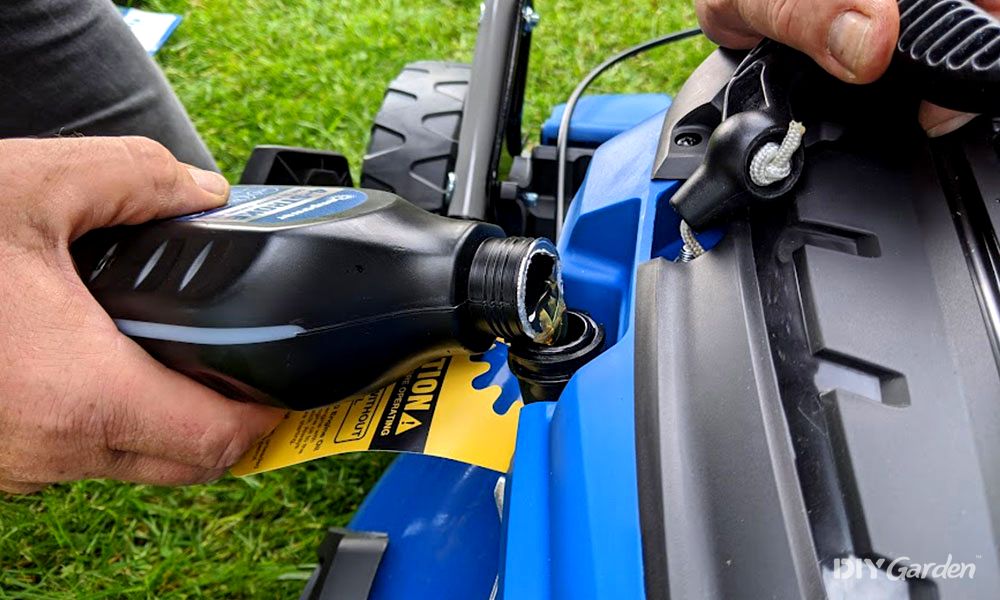
4. Change the Oil
Lawn mower oil should be changed annually, or after around 50 hours of use (whichever comes first). You should also check the oil levels each time you use your mower, in case it needs topping up.
To change the oil, you’ll need to use an oil extractor to draw the old oil out. Don’t be tempted to tip your mower upside down instead – this will only damage it.
Dispose of the old oil correctly and then pour in the right amount of fresh oil – use the dipstick to ensure that your oil is at the recommended level.
5. Lubricate Joints, Wheels, and the Lifting Mechanism
A little WD-40 can work wonders in keeping a petrol lawn mower running smoothly. To start with, give all control joints and cables a clean, before lubricating with WD-40.
Do the same with your lawn mower’s lifting mechanism – this is what allows you to adjust its cutting height.
6. Tighten the Wheels
Once the wheels have been lubricated, use a screwdriver to tighten them. Now is also the time to check that they still have adequate tread. If any of the wheels are lacking, they may need to be replaced.
7. Sharpen the Blades
This is an area where you may require professional help; you need to have the right tools and be cautious whilst working around a sharp blade.
Nevertheless, we’ve written an article about how to sharpen lawn mower blades which is well worth a look. It’s even possible to sharpen the blades without removing them from the mower which you may want to consider depending on your mower type.
A grinder or flat file is usually the preferred method – this ensures accuracy when it comes to the angle of the blade, and also helps to keep the blade evenly weighted.
8. Clean or Replace Your Spark Plug
At this stage, you’re almost done! But, before putting the spark plug back into your petrol lawn mower, give it a clean first.
Alternatively, you could replace it with a new one. Although this doesn’t need to be done annually, the spark plug should usually be changed after 25 hours of work. If you’re struggling to start your mower, the spark plug is a common culprit.
9. A Final Once-Over
Before starting your lawn mower up, give it a final check to make sure that you’ve replaced all nuts, bolts, and screws. If you find that you’ve misplaced one while servicing your lawn mower, you’ll need to buy a replacement – don’t be tempted to start your mower if it’s missing any pieces.
As you can see, although there are quite a few steps involved in servicing a petrol lawn mower, each task is relatively simple and straightforward. There are also a lot of videos available online that can be followed step by step.
Once you know what you need to do, servicing your mower will be quick; plus, it will save you paying for it to be serviced when you can check it over yourself.