Are you tired of spending a fortune on soil for your container garden? Want to make gardening easier, more sustainable, and save money?
We’ve got you covered!
In this blog post, we will unveil expert tips and ideas on how to fill large pots for plants, share creative filler ideas, and help you master watering and drainage!
Learn how to fill large pots for plants effectively and say goodbye to heavy, expensive pots and hello to a thriving, budget-friendly garden!
Key Takeaways
- Properly filling large plant pots is key for healthy plants.
- Choosing the right potting soil and including drainage holes are essential.
- Reuse & recycle household items as fillers.
- Stick to a watering & fertilising schedule to keep your container garden thriving!
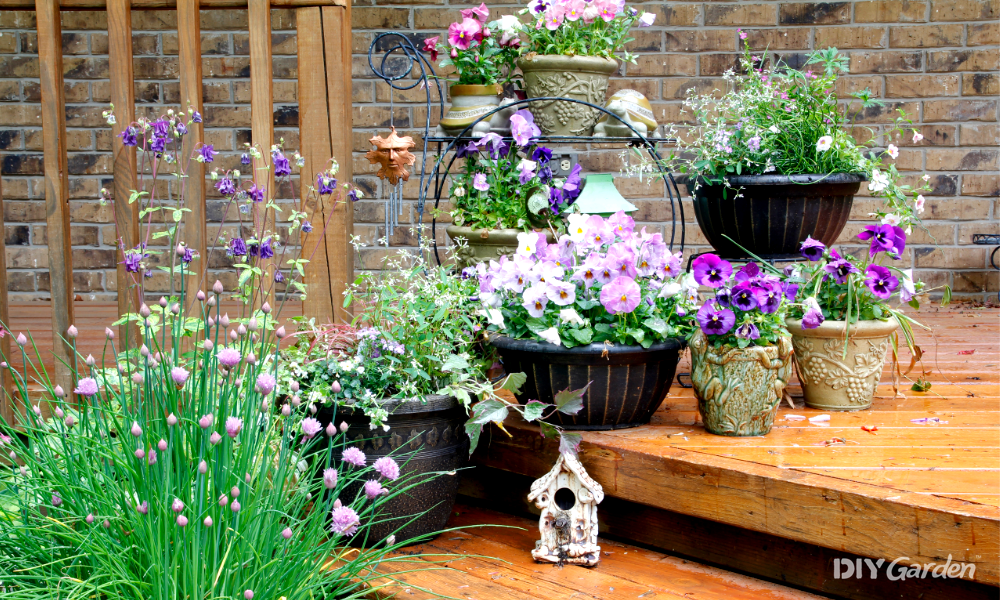
The Importance of Properly Filling Large Plant Pots
Picture this: You want a shiny new pot for your garden, and you fancy filling it with a big tree or large shrub. The only problem is, how are you going to carry it?
And if you ever need to move the plant, what are you going to do?
Needless to say, selecting the right pot and potting soil is crucial. Not only for your plant’s health and growth, but also for your back! Ensuring your large planter has drainage holes is also essential, as this prevents root rot.
Fibreglass is a popular choice for large planters because of its lightweight, durable, and weather-resistant properties.
So, when you’re picking a pot, give fibreglass a thought, and always consider the weight and mobility requirements of your container garden.
Now that you’ve picked the perfect pot, it’s time to fill it up. I remember when I first started gardening – I assumed you have to fill the whole pot up with soil. But that’s where I was wrong!
Using filler material is a smart idea, as it not only saves money but also makes the pot lighter and easier to handle. Additionally, filler materials can improve drainage and prevent waterlogging.
But a wise word of warning – be cautious about the materials you choose. Some may block drainage holes or affect the soil pH, leading to unhappy plants. If you see any signs of mould or insects like gnats, or a bad smell coming from your potting soil, keep it far away from your beloved plants!
Selecting the Right Potting Soil
High quality potting soil is the lifeblood of indoor plants, providing essential nutrients and allowing for proper drainage. I’m speaking from a place of many potting soil disasters!
When choosing potting soil, it’s best to opt for a high quality potting soil that’s tailored to your plant’s needs or all-purpose potting soil.
Avoid garden soil at all costs, as it’s too heavy and can cause serious drainage issues.
Remember, a healthy plant starts with the right soil, so don’t skimp on this crucial element!
When it comes to filling your large planter, be mindful of how much soil you’re using. Too much soil can lead to root rot and other issues.
Instead, consider using lightweight pot fillers like plastic milk jugs, water bottles, or wood chips to fill the bottom of your pot.
This will not only save you money on potting soil, but also make your planter lighter and easier to move around. My personal favourite is pine cones – you can’t beat a natural material and they’re so easy to find!
Drainage Holes: A Must-Have Feature
Drainage holes are a non-negotiable feature for large plant pots. They ensure proper water drainage, preventing root rot and promoting healthy plant growth.
To keep your drainage holes working efficiently, make sure they aren’t blocked by filler materials or debris. Don’t worry if your pot doesn’t have a drainage hole. There are other solutions to ensure the soil and roots get adequate water.
You can always install them yourself using a masonry drill bit. Just remember that adequate drainage is crucial for happy, healthy plants.
To further improve drainage, consider using filler materials like pine cones or broken ceramic pieces at the bottom of your pot. These materials will prevent soil from compacting and allow excess water to flow through the pot more easily.
Proper drainage is essential for most plants, so always ensure your pot has sufficient drainage holes and is filled with materials that promote good water flow.
READ NEXT: What To Put In The Bottom of a Planter For Drainage
Lightweight vs. Heavy Fillers: Making the Right Choice
When it comes to pot fillers, there are two main categories to consider: lightweight and heavy fillers. The right choice depends on your gardening needs and the type of plants you’re growing.
Lightweight fillers, such as plastic containers or upturned plastic plant pots, can help reduce the weight of your planter and cut down on potting soil usage. On the other hand, heavy fillers like bricks or broken ceramic pieces are ideal for larger plants or areas requiring more stability.
No matter which type of filler you choose, always make sure it’s safe for your plants and doesn’t cause any issues with drainage or soil quality.
Using pot fillers offers several benefits, such as saving money, adjusting the weight of the planter, and improving drainage. However, there are potential concerns to be aware of, such as bacteria growth and water collection.
By carefully considering your gardening needs and the types of plants you’re growing, you can make the right choice between lightweight and heavy pot fillers.
Lightweight Pot Fillers
Lightweight pot fillers are an excellent option if you’re looking to save money and reduce the weight of your plant pots. Common lightweight filler materials include plastic waste like milk jugs and water bottles, as well as organic matter such as twigs, wood chips, and leaves.
These materials not only help to occupy the extra space in large pots, but they also improve drainage and prevent waterlogging.
However, it’s important to note that decomposing pot fillers can cause issues in the long term, particularly for plants in larger pots.
Over time, decomposing fillers can leave holes in the base of the pot, create air pockets for roots, cause potting soil to collapse, or alter the soil pH.
To avoid these issues, opt for non-decomposing materials such as plastic containers or plastic pots, ensuring that your pot remains lightweight and your plants stay healthy. Or, if you’re happy to repot your plant every year and would rather go down the organic route, that works, too!
Heavy Pot Fillers
Heavy pot fillers are necessary for larger plants, property fencing, or high-traffic areas due to their stability.
They provide a solid foundation for your plants, ensuring that the pot remains sturdy and secure. Common heavy filler materials include broken ceramic pieces, bricks, or large rocks, which can help anchor your planter and prevent it from tipping over.
Keep in mind that heavy pots can be difficult to move, so it’s essential to place your tall planter in its permanent location before filling it with heavy items.
By choosing the right heavy filler materials for your specific gardening needs, you can ensure that your plants remain stable and secure, allowing them to flourish.
How to Fill Your Large Plant Pot: Step-by-Step Guide
You may think – uh oh, it’s time to fill my large plant pot. But filling a large plant pot doesn’t have to be a daunting task.
By following a step-by-step guide, you can ensure a successful planting experience.
- Start by selecting the right size pot with adequate drainage holes, using quality potting soil, and giving it a thorough clean. Basically, everything we’ve already spoken about!
- Next, add your chosen filler material to the bottom of your pot. Once you’ve filled the pot with soil, it’s time to start planting your plants, ensuring they’re properly positioned and not buried too deep in the soil.
- After planting, press the potting medium around the base of each plant to ensure everything is secure and there are no exposed plant roots.
- Finally, give your newly potted plants a good watering until you see the water start to come out of the bottom.
With these simple steps, you’ll be well on your way to a thriving container garden – you may even give your local garden centre a run for its money.
But I recognise these steps make it seem straightforward. What if you’re still left wondering, “how do I prepare the pot?” or “how do I layer my potting soil and plants?” If this is you, the next sections are your best friends!
Preparing the Pot
Before you begin filling your plant pot, you need to properly prepare it. Start by giving your pot a thorough rinse with hot water to remove any dirt, debris, or potential pests.
First, think about which lining would work best for your pot. Plastic or fabric could be a good option. Lining the pot can help prevent minerals from building up on the inside surface and stop ceramic or clay pots from cracking in cold weather.
Properly preparing your pot not only ensures a clean environment for your plants, but also increases the longevity of your pot. By taking the time to clean and line your pot, you’ll set the stage for a successful container garden.
Layering Potting Soil and Plants
With your pot prepared and filler material in place, it’s time to add a layer of potting soil. Fill your pot with soil up to about two inches below the rim, ensuring there’s enough space for your plants to grow.
Next, carefully remove your plants from their nursery pots and place them in the container, filling the gaps around the plants with more potting mix. Make sure the stems are not deeper in the soil than in their original pots.
After planting, press the potting medium around the base of each plant to ensure everything is secure and there are no exposed roots. Finally, give your newly potted plants a good watering until you see the water start to come out of the bottom.
With these simple steps, you’ll be well on your way to a thriving container garden.
Creative Filler Ideas: Reusing and Recycling Household Items
Using household items as filler materials in your large plant pots is not only budget-friendly, but also environmentally friendly. Reusing and recycling common household items can help minimise waste sent to landfills and incinerators, cut down on pollution, save natural resources and energy, and create economic advantages. For example, by repurposing these items, you save money on potting soil and filler materials, making your container gardening more budget-friendly. Here are some great filler materials to try:
- Takeaway containers
- Milk jugs
- Plastic bottles
- Drinks cans
- Pinecones
- Twigs
- Wood chips
- Packing peanuts
By repurposing these items as pot fillers, you’re giving them a new life and contributing to a more sustainable gardening practice. So next time you’re looking for filler ideas, take a look around your home and get creative with the materials you already have on hand.
Expert Tips for Maintaining Healthy Plants in Large Pots
To keep your plants thriving in large pots, it’s important to follow expert tips on proper drainage, watering techniques, fertilising, and soil maintenance.
By selecting the right size pot, using quality potting soil, and ensuring adequate drainage, you can provide an optimal environment for your plants to flourish. Additionally, fertilising your plants regularly will help supply them with the nutrients they need to grow strong and healthy.
By maintaining proper care for your plants, you’ll not only enjoy a beautiful container garden, but also reap the rewards of a more sustainable and budget-friendly gardening practice.
So, keep these expert tips in mind as you care for your plants in large pots and watch them thrive.
Proper Drainage and Watering Techniques
A drainage-friendly potting mix can help prevent waterlogging and root rot, while proper drainage holes allow excess water to flow through the pot more easily.
To maintain proper watering, regularly check the soil moisture level and adjust your watering schedule accordingly, avoiding overwatering or underwatering your plants.
By following these best practices for drainage and watering, you’ll create an optimal environment for your plants to thrive.
Remember, proper care and attention to your plants’ needs are key to maintaining a vibrant and successful container garden.
Fertilising and Soil Maintenance
Fertilising and soil maintenance are essential for keeping your plants healthy and happy in large pots.
Slow-release fertilisers, designed to last three months, and liquid kelp, seaweed, or fish-based fertilisers are excellent choices for providing your plants with the nutrients they need.
In addition to fertilising, regular soil amendments like compost, manure, or other organic matter can enhance soil structure and fertility, ensuring your plants have a nourishing foundation to grow.
Summary
In this blog post, we’ve shared expert tips and ideas for filling large pots for plants, including selecting the right pot and potting soil, using creative filler ideas, and maintaining healthy plants. By following these expert tips and reusing and recycling household items as pot fillers, you can create a thriving container garden that’s both environmentally friendly and budget-conscious. So get creative, repurpose those household items, and watch your plants flourish in their new home!
If you found this useful and want to know more about planting in pots, you’ll love our article, The Foolproof Guide to Container Gardening!