
Read Reviews
The Best Garden Wildlife Cameras
-
GardePro A3 Trail Camera
-
Crenova 4K Trail Camera
-
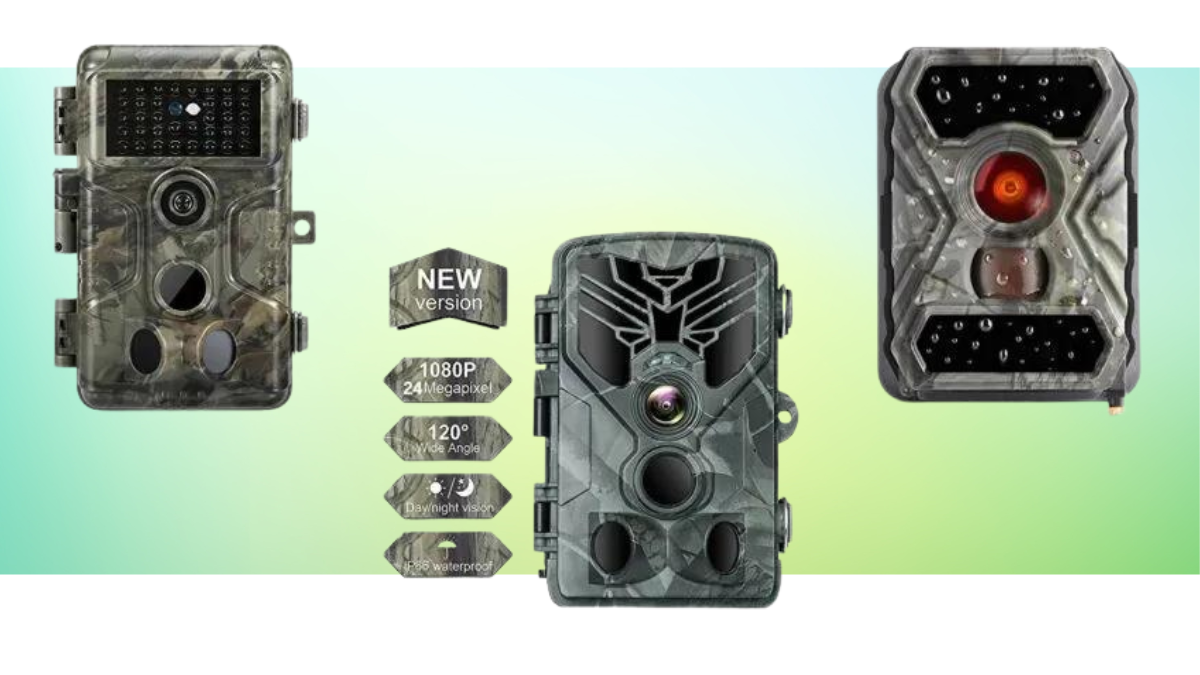
SUNTEKCAM 24MP 1080P Wildlife Camera
-
Technaxx Nature Wild Cam TX-69
-
SecaCam HomeVista Premium Pack
Garden Wildlife Camera Reviews
- Night vision is very good, with visibility up to approximately 18 metres away
- Motion detection is reliable - can detect even very small animals
- Clear and logical interface makes camera easy to set up
- Completely waterproof and water does not seem to visibly ruin video either
- If set up in a high traffic area such as a bird feeder, the battery life could be as short as 7 - hours
- Night time recordings are limited to 30 seconds
- Removing the batteries requires you to manually reset the internal clock and date
- Provided strap is not long enough to secure the camera to large trees
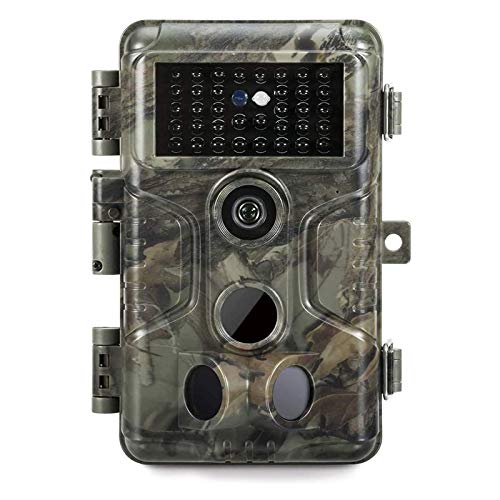
If you’re interested to know which animals are visiting your garden, day or night, the GardePro A3 Trail Camera is a great option to consider. It records clear videos (with sound) to give a fascinating insight into the wildlife that comes to your own back yard. It can also take 24 megapixel photos.
Even when there’s very little light available, during cloudy nights for example, the camera is able to produce clear pictures using its low-light-recording features. These include no-glow LEDs and a large lens aperture. It records using a resolution of 1080p, which equates to approximately 2MP, at a rate of 30 frames per second.
Instead of recording all night (or day) long, the camera only starts to record when it senses movement which is useful for saving both memory and battery. It requires an SD card to store the photos or videos, which doesn’t come included.
The videos are stored as MP4 files, which, according to GardePro, use 80% less space than AVI files (used by more basic trail cams), allowing more media to be stored. Nevertheless – this trail cam is quite hungry with its memory usage; approximately six minutes of video can use around 15 GB of space.
The media files can either be downloaded onto a computer directly from the SD card, or using the mini-USB cable provided.
In terms of performance, this camera can sense animals up to 25 m away from the lens and, as mentioned, the night vision is particularly good. The infrared makes it possible to see images on the camera up to 18 m away in the dark. Overall, this is one of the best garden wildlife cameras for recording clear night-time images. Two side sensors, operating at 30°, prepare the camera even when the subject isn’t even in the main 60° camera trigger zone.
The biggest downside to the design is probably the battery consumption. Within 7 or 8 hours of continuous recording, it’s likely that the batteries will run out. How long this actually takes will depend on the traffic in the area – if recording in a high-traffic area (like near a bird feeder) this could cause the 8 x AA batteries (not included) to run out very quickly.
Also, each time the batteries are removed, the date/time clock will require manually resetting, which is a little time consuming and inconvenient.
Apart from this, setting up the camera is very straightforward, with a logical interface and clear screen. Like most trail cams, the camera can also be displayed on the screen during set up, to make sure the unit is positioned to capture the desired area in the garden.
Did you find this review helpful?
- 4K (~8MP) camera creates very crisp, high-quality images, especially during the day
- Reasonable battery life - not excessively hungry and can use rechargeable batteries
- Allows video recordings up to 90 seconds which is longer than many trail cams
- Comes with a 32 GB SD card included
- Instructions are easy to follow and set up is easy to do
- Trigger speed can be delayed, meaning some of the animal's movements get missed
- Delay between end of one clip and start of the next can be as much as 15 - 20 seconds
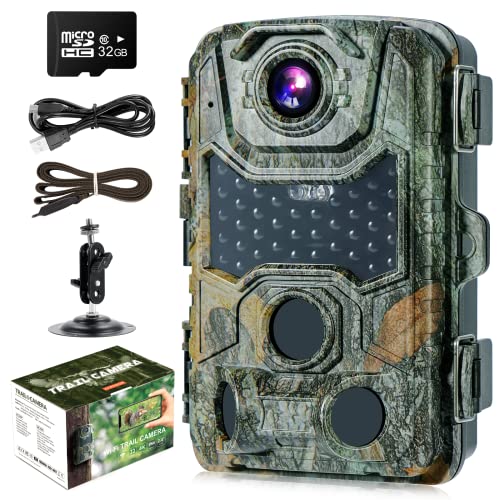
Running your own ‘Springwatch’ from home is pretty easy to do nowadays, especially using equipment like the Crenova 4K Trail Camera. It’s extremely simple to set up and easy to use, producing clear 4K videos (approx. 8MP) so that you can keep an eye on the wildlife in your garden, day or night.
It also has a a 20MP camera with which it can take still images. The Crenova trail cam has the ability to take either still photos, videos, or timelapses. All of the images it produces are clear and in crisp colour during the daytime. At night, it uses infrared LEDs to create black and white media with well-balanced tones that clearly depict wildlife, even in the dark.
There are several useful features that make this camera simple to use, as well as some drawbacks to its design which will be covered below.
Good things first: it comes with a 32 GB SD card meaning that no additional memory is required to get it to work. Given that the set up is easy, and the instructions are clearly explained, the camera can be up and running within a few hours of opening the box.
It also has the capacity to take 8 x AA batteries (not included), but only requires 4 x AA to run. The extra four can be placed inside the camera as a backstop, for when the first set runs out (however, this is optional).
Customers report success using rechargeable batteries, which is a better choice for both the environment and wallet. Battery usage is high, but not excessive – eight batteries may run out of charge after approximately four weeks (recording an average of 30 x 20 second videos per night). It’s also possible to use an external power supply, but none of the cables are provided for this.
To help with conserving power, there is a programmable timer function so that the camera is only active when you want it to be.
Now to the downsides. Although the camera states to have a 0.2 second trigger speed, it seems to often take longer to start recording – anywhere up to 10 seconds. Naturally, this means some footage can get lost.
The video recording length is also limited, to between 10 – 90 seconds, so don’t expect to capture any feature-length films. However, it’s worth pointing out that 90 seconds is actually longer than some other trail cams allow (for example, the GardePro A3 Camera can only record a maximum of 30 seconds).
There’s also a delay time between each clip, of around 15 seconds, so you miss some of the activity in between videos.
Nevertheless, this is one of the best garden wildlife cameras if you want something that is easy to set up and use. It has some interesting features, such as the timelapse option, as well as a decent 4K camera, so you can also learn to use it more effectively as you go.
Did you find this review helpful?
- Capable of capturing clear images of wildlife during both day and night
- Comes with an 8 GB micro SD card included which adds value for money
- A good option for those on a tighter budget
- Video files are AVI, not MP4, which takes up more space and can be more difficult to work with
- Requires micro-SD card, so can't use any standard existing SD cards
- The mounting arm can start to show signs of rust over time
- Especially in night vision, the light exposure isn't always well balanced
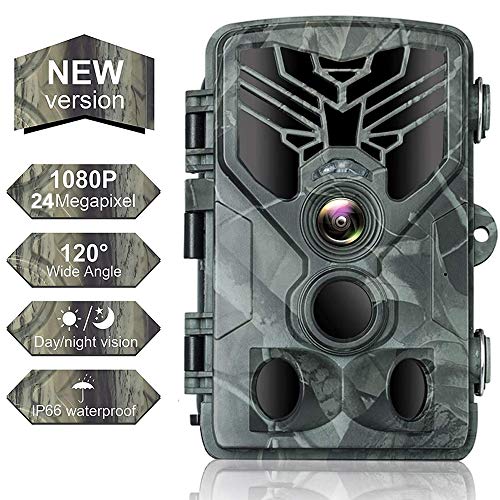
The SUNTEKCAM 24MP Wild Camera is a great budget option, offering many of the same features as more upmarket models.
It offers 1080p (~2MP) video recording, has a 24 megapixel camera for still photos, 36 infrared LEDs (allowing for both day and night vision) and the ability to record at a 120° angle. It’s also easy to set up and operate. Of course, there are some functions that it doesn’t perform quite as well as premium cameras, but given the price it’s one of the best garden wildlife cameras if you’re working on a budget.
If you’re simply looking to get some basic footage of the wildlife in your garden, this camera will be more than adequate. The images may not be quite as crisp as the other cameras on this page, with the night-time light-balance occasionally creating more “burnt” images (not enough light balance resulting in whiter/brighter shapes), but they’re still of reasonable quality.
For best results, the animals need to pass within approximately 5 metres of the camera, as its sensitivity is a little less accurate than some other models as well.
Images are recorded onto a micro-SD card, and an 8 GB card is included in the purchase. There’s also a USB cable so that you have a choice of methods to upload the videos to your computer. Unfortunately, the video format is a little outdated, using AVI files instead of MP4, which take up more space and can be more inconvenient to work with.
There is a mounting strap included, for attaching the camera to small trees, and a fixed metal stand.
As you can see, this is a good, basic trail cam, although it’s not without flaws. Given the price, it performs as you would expect, and if you’re only after a camera to capture a bit of the wildlife in your garden (and perhaps capture the interest of kids and/or grandkids at the same time) then it’s a good option to consider. If you’re more concerned with video quality and ensuring you don’t miss any wildlife, you might prefer a more premium model.
Did you find this review helpful?
- Intuitive and very easy to use
- No need to attach to a tree or fence, camera can be stood up on its own in calm weather
- Takes good quality pictures and videos - crisp and clear
- Long battery life of up to 3 weeks depending on the model
- IR lights are visible in night mode which may disturb some wildlife or leave your camera vulnerable to theft
- Micro SD card is difficult to change
- The recording start time may be too slow for faster animals
Finding gadgets that offer value for money isn’t always easy, but the Technaxx Nature Wild Cam TX-69 offers a good balance between quality, performance and price.
It’s a relatively middle-of-the range camera, with some features that match more upmarket models.
The camera records video in 1080p resolution (equal to approximately 2MP), the same as many other units on this list. When it comes to photos, it shoots at 12 megapixels, which is slightly less than a lot of other cameras (for example, the budget SUNTEKCAM uses 24 megapixels). However, this is less important if you’re going to be using the camera predominantly for videos.
There’s a built-in microphone and speaker, as well as a timer and timelapse function. The timer helps with conserving battery power and is relatively straightforward to program – there is a 960 x 240-pixel screen on the unit with a keypad for setting different functions.
It’s worth pointing out that the camera trip time is advertised as 0.6 seconds, which is the slowest published time of all the cameras on this page. It also triggers late, resulting in a fair few seconds of video being missed.
Included with the camera is a mini USB cable for connecting it to the computer, as well as an AV cable (which isn’t included with many other cameras) for playing back the recorded media on the TV. 8 x AA batteries are required but don’t come included, and you’ll also need to supply a micro-SD card.
Overall, this is one of the best garden wildlife cameras if you’re after value for money. It shoots videos at reasonable quality, during both day and night, and can take photos and timelapses too. Once again though, just be aware that it has a slow trigger speed.
Did you find this review helpful?
- Takes good quality pictures and videos, and the sound is very clear
- Trigger activates quickly, even when detecting smaller animals
- Choice of frame types gives option for wide lens or better distance shots
- SD card and 8 x AA batteries come included
- Choice of different resolutions when taking photos to save on memory space
- Date and time needs to be reset whenever you change the batteries
- Can be overly sensitive and be triggered by blowing leaves
Coming with everything required to start recording straight away, including batteries and an SD card, this SecaCam HomeVista Premium Pack is a high-quality product that will satiate the needs of most wildlife hobbyists.
There are two different frame types available – either ‘HomeVista’ or ‘Raptor’ – which is a choice not offered by other cameras on this page. HomeVista provides a wide 100° shot, capturing a lot more background and surrounding action, whilst Raptor is a narrower 52° and can focus further into the distance. As you can imagine, having the choice makes it possible to get the most out of the camera, depending on where it is positioned.
It captures night-time images using 56 black LEDs which produce no glow – the camera is completely undetectable. The images and videos, during both daytime and night-time, are clear and the tones are well balanced. The camera captures small animals, such as mice and insects, just as easily as larger animals like foxes and deer.
The overall quality of the images are very good; you can choose to take photos in a range of qualities, from 5 – 12 megapixels, and the video records in ‘Full HD’ (which generally equates to approx. 2MP). The trigger is also quick to recognise movement, for both photos and videos, meaning the camera doesn’t miss a lot of action.
The set of 8 x AA batteries, and SD card, supplied with the camera, will allow for approximately 60 minutes of video – but there is an adjustable timer in order to limit how long each individual recording lasts for.
Programming the camera in general isn’t difficult to do either. The display screen is easy to navigate and all of the functions, like timers and timelapse, are simple enough to get to grips with.
Overall, if you’re after a versatile piece of recording equipment, this is one of the best garden wildlife cameras to go for. Not only does it offer a range of frame options, it’s also sensitive enough to pick up a lot of different animals and starts recording quickly. You also get to choose which resolution to use for photos, in order to use less memory space.
The only downside of having all these features, of course, is that it’s a little more expensive than other cameras on this list – but it does at least come with both an SD card and 8 x AA batteries included.
Did you find this review helpful?
Clive's Smart Buying Tips
How to Choose the Best Garden Wildlife Camera
Trail cameras are fascinating things that can help reveal a whole world of wildlife to us – right from our back garden.
However, they can also be pretty complicated to understand – especially if you’re new to the universe of cameras and don’t know what to look out for. There’s a lot of jargon mixed up with trail cameras that can get confusing.
To help you find the best garden wildlife camera, and get the most out of your money, we’ve put together the following guide so that you can have a better idea of what to look out for.
Trigger Speed
Trigger speed is very important when it comes to spotting wildlife. This refers to the amount of time between the movement of an animal and the time it takes for the photograph to be taken (or the video to start recording).
A trigger speed that’s too slow will mean you may miss wildlife altogether – by the time the camera has taken a photo, the animal will already have disappeared.
Some of the best trail cams have a trigger speed of approximately 0.1 seconds. Slower cameras may take as long as 10 seconds. It’s recommendable to read reviews from customer’s first-hand experiences – these will often indicate how quickly the camera starts to record, especially if it takes an inconveniently long time.
Recovery Time
Trail cams only record for a short amount of time. Often, they record for around 30 seconds but some cameras let you choose how long to record for (commonly between 10 – 90 seconds).
Once the camera stops recording, it will have some ‘recovery time’ before it is able to record again. Generally, this is because it takes time for the machine to save the recorded file.
If the animal is still present after the recovery time, it will set off the camera again. However, if the recovery time is too long, you may miss out on a lot of valuable recording time.
Manufacturers will often state how long the recovery time is on their camera. If not, you may need to contact them in order to get a better understanding of the camera’s specifications.
Resolution
Like standard cameras, the higher the resolution, the better the quality of your pictures and videos.
There are a few factors worth knowing here, because different cameras use different terminology when talking about resolution, making them initially difficult to compare.
The best wildlife cameras for the garden will record videos with a resolution of 2 – 10MP (megapixels). However, you may also see “1080 pixels” mentioned, along with “HD”, “Full HD” or “4K” – so what do these mean and how can you compare them?
If a camera describes itself as “1080p”, this isn’t referring to the total number of pixels used for recording. “1080” refers to the size of the camera frame. When HD TVs first came out, they had a standard frame of 1920 x 1080 pixels. Therefore, “1080” is often associated with HD quality. If a camera says “1080p” then it will be approximately 2MP.
This is often considered ‘full HD’. A camera that records to a smaller frame size of 720p may be referred to as “HD”. This will have a resolution of approximately 1 megapixel.
Finally, there’s “4K”. When used in most commercially available products (and not high-end cinema equipment) 4K equates to approximately 8MP.
When it comes to wildlife cameras, the resolution of the videos is usually lower than that of the photos. The still photo cameras on wildlife cams tend to be between 12 – 24 megapixels. Generally speaking, you’re unlikely to tell much difference between the two – unless you’re wanting to really enlarge the image or heavily crop it. For most casual wildlife-spotting in the garden, the resolution of photos is not too important and anything above 12 megapixels will be sufficient.
However, it is worth remembering that higher resolution photos will take up more memory. Cameras that take high-resolution photos may need to be fitted with larger SD cards. Some cameras allow you to adjust the resolution of the photo from the device itself, so even if it has a 24 megapixel camera, you may choose to take 10 megapixel photos in order to conserve memory.
Infrared LEDs
For night time images, you’ll require artificial light. Infrared options are the most popular as they won’t scare away the animals – unlike the blinding white flash of a traditional camera!
No-glow LEDs are almost completely unnoticeable to animals, so wildlife is unlikely to get spooked when the lights come on and the camera starts recording.
Low-glow LEDs can give off a slightly red light, and are more likely to be noticed by animals. This could cause them to run away. Cheaper trail cams may be fitted with low-glow LEDs, so make sure you know what you’re buying when you make your purchase.
Waterproofing
A wildlife camera’s protection against water ingress is measured using the IP (ingress protection) scale.
For example, you may have seen products described as ‘IP66’. The first number relates to how well the product is protected against ingress from solid objects (e.g., dust). The second number relates to how well the product is protected against water ingress.
When it comes to trail cams, you want the second number to be at least ‘6’. This means that water from heavy jets will not be able to get inside the workings of the machine. The second number can go as high as 8, which means that the item is protected from immersion under water (not really necessary for trail cams).
The first number should be at least a ‘5’, which means it is protected from the majority of dust ingress. A ‘6’ means the item is dust tight.
File Types
Different wildlife cameras save their media under different file names. Nowadays, for videos, “.mp4” is a good file type to look out for. These files are easy to work with and compatible with a lot of different computers and playback programs.
Some wildlife cameras may still use older file types, such as “.avi” files. These are starting to become a little outdated – they’re not as compatible with all modern computer programs (which may pose problems for viewing the videos) and they can take up more space than “.mp4” files.
Whilst both file types will be able to work well, it helps to be aware of what you’re buying so that it doesn’t cause problems down the line.
If you get really into using your trail camera, you might also be interested in a bird box camera – these are particularly interesting to keep an eye on in spring.
Garden Wildlife Camera FAQs
Inspect your garden for trails, droppings and footprints and set up the camera to face these areas.
Remember that patience is key. Even if you have to go a few days (or weeks!) without seeing an animal, have faith that you will eventually. It may be that your camera simply needs repositioning.
Remember that the right habitats will attract wildlife. Providing a water source is one of the best ways to attract a range of wildlife to your garden. In the winter, you can put out food for hedgehogs/foxes. Face the camera towards the food, and you may find that you capture a few different animals on the recording (be warned – this can also attract neighbourhood cats!).
Trail and wildlife cameras should be mounted at the correct height to ensure optimum viewing. If you’re looking to capture a specific animal, it should be mounted at the height of the target’s chest.
However, if the detection range is large enough, you should be able to spot wildlife even if it’s not mounted at the perfect height.
You should also think about where to mount your garden camera. If you have a water source or feeding area, the camera should be mounted near to these. If you want to capture insects, lure them towards your camera by setting up a food station.
Finally, if you are setting up your camera in the daytime, avoid mounting it facing the sun. When the sun is behind the target, the image won’t be as clear.
Contrary to popular belief, if you’re just keeping an eye on the wildlife as a hobby, you don’t need a ridiculous amount of megapixels. If the camera takes videos of 1080 pixels, that will be plenty. For photos, a camera with between 12-24 megapixels will be sufficient.
Share